Price Increase on Miraco and Ritchie Waterers April 1st.

PeteCO SUPPLY
Small and Family-Owned
SHIPPING - All products ship within the same or next business day unless noted.
NORMAL Shipping takes between 2-5 days, Freight 1-2 weeks. Need a freight quote on large items? Click Here.

This replacement kit includes a complete valve, float, and arm assembly. Used currently in all Behlen Electric and Energy Free automatic waterers.
The kit includes the MC Valve, valve arm, two wing-nuts and Behlen float. Regulate the water level in your trough by adjusting the valve arm lower or higher. The grooved attachments will hold your setting in place.
Instructions How To Assemble The Float And Arm To The MC Valve And How To Adjust The Valve
The MC Valve is already attached to the drinker. The float and arm assembly is with the hardware kit. They are packaged separately to prevent undue wear to the valve caused by the arm bouncing up and down during shipping. The fl oat and arm are attached to the valve by a thumb screw. The float can be positioned either closer or further away from the valve (see photo below left for the two float positions). Further away increases the shut off force of the valve. However depending upon which drinker is being used, the closer position may be required to maintain proper clearance for the float to the side of the drinker.
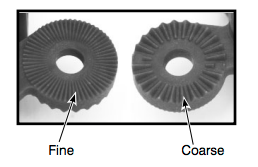
A clearance of at least 1/2” should be maintained to ensure smooth operation of the valve. When attaching the fl oat arm to the valve, be sure to attach the arm to the correct side of the valve. The grooves on the valve and float arm must match. Please note that the valve has coarse grooves on one side and fine grooves on the other. The fine grooved side is used with the float arm (see below for details).

To adjust the water level in the drinker, loosen the thumb screws and position the float and arm so that the valve is turned off when the water is at the desired level (see photo at left). It may take a couple of adjustments to get the correct level (1-1½” below the top of the trough). To speed the adjustment process, remove the drain plug and drain a little water out so that the valve turns on. Put the drain plug back and let water fill until the valve shuts off. If the level is not correct, repeat the process until the correct level is obtained and then replace the fl oat cover.
Your drinker is now ready for use.